
Last updated on: September 12, 2017 12:34pm
How to Prepare Perfect Red velvet cake
September 12, 2017 12:34pm - 7 min read
Red velvet cake. Red velvet cake is traditionally a red, red-brown, crimson or scarlet-colored chocolate layer cake, layered with ermine icing. Traditional recipes do not use food coloring, with the red color due to non-Dutched, anthocyanin-rich cocoa. Red Velvet Cake is not just a chocolate cake with red food colouring added.
The acidity is balanced out by the sweetness of the cake itself. The Best Red Velvet Cake recipe is now here! This red velvet cake recipe is the one my mom always used. You can cook Red velvet cake using 19 ingredients and 9 steps. Here is how you cook it.
Ingredients of Red velvet cake
- Prepare of All purpose flour.
- Prepare of corn flour.
- It’s of cocoa powder.
- It’s of salt.
- It’s of baking soda.
- You need of sugar.
- Prepare of canola oil or any flavorless oil.
- You need of Thick buttermilk/chaas.
- Prepare of white vinegar.
- It’s of vanilla essence.
- Prepare of Red food colour.
- It’s of For The Sugar Syrup.
- You need of Sugar.
- Prepare of Water.
- Prepare of Cream Cheese Frosting.
- It’s of cream cheese softened.
- Prepare of unsalted butter softened.
- Prepare of vanilla Essence.
- Prepare of sugar.
Although cake flour is usually used for classic red velvet recipes to make it light, I wanted to stick to all-purpose flour in my recipe, so that. This recipe produces the best red velvet cake with superior buttery, vanilla, and cocoa flavors, as well as a delicious tang from buttermilk. It's such a beautiful and delicious. These Red Velvet Cupcakes are soft, light, moist, and topped with an easy cream cheese frosting.
Red velvet cake instructions
- Pre heat oven to 180 degree C for 15 minutes then Grease the baking pan and keep aside,Sieve all dry ingredients in one bowl. Give it a quick mix with a dry spoon.
- Mix all wet ingredients in another bowl including food colour, mix very well.
- Add the dry ingredients to wet ingredients and mix until just combined, do not over mix..
- Transfer the batter into the greased pen and tap it lightly and Bake them for 25 – 30 minutes or until a toothpick inserted into the center comes out clean. Do not over bake. Let it rest for 10 minutes in the pan then turn out onto a cooling rack and allow to cool completely.
- For the Frosting Combine the butter and cream cheese in a deep bowl and beat it using an electric beater till smooth. Gradually add the sugar and beat again till smooth. Cover with a lid and refrigerate for at least 30 minutes..
- For the sugar syrup Combine the sugar and water in a microwave safe bowl and microwave on high for 2 minutes. Mix well and keep aside..
- Place the red velvet sponge cake on a flat, dry surface and slice it horizontally into 2 equal layers. Keep aside. Place both the layers of the red velvet sponge cake on dry surface and soak it with sugar syrup evenly over each layer..
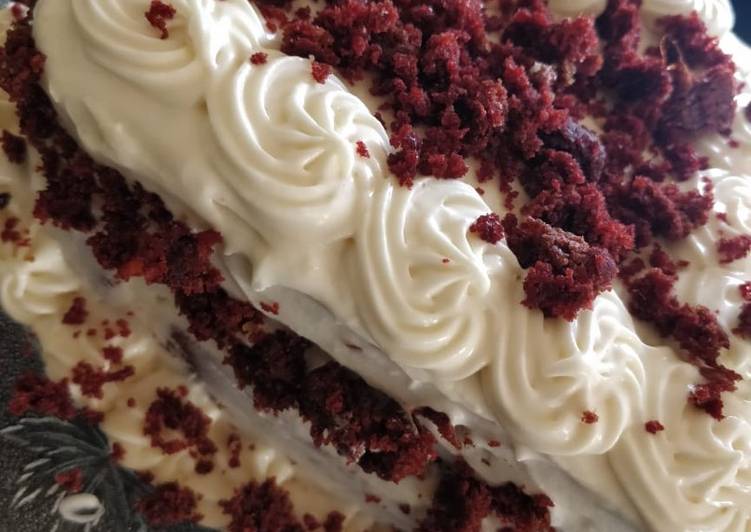
- Put ½ cup of the prepared cream cheese frosting on the lower half of the sponge and spread it evenly. Cover with the other half with the soaked sugar syrup side facing upwards and press it lightly. Spread 1 cup of the prepared cream cheese frosting on top and at the sides of the cake with the help of a palette knife. put the remaining prepared cream cheese frosting in a piping bag with a star nozzle fitted in. Decorate the circumference of the cake by making any design of your choice..
- Make few swirls at equal distance Sprinkle some cake crumb and edible coloured sprinklers and balls. Refrigerate for atleast 1 hour, Cut into wedges and serve chilled. Notes I have used Americolor super red gel colour 1 tablespoon..
Cake flour: Cake flour has a lower protein content than all-purpose flour, which helps create a lighter. Red velvet cake…it has eluded me for so long!! You've been asking me to share my favorite red velvet layer cake recipe, and I've wanted to. I wasn't procrastinating, I just hadn't made a red velvet cake I. This red velvet cake recipe is SUPERB!!!!